%20(1).png)
.png)
https://www.freecodecamp.org/news/essential-javascript-concepts-before-react/
https://www.freecodecamp.org/news/build-a-dynamic-dropdown-component/
JavaScript is one of the most popular programming languages out there for web development.
The dynamic values passed in a JavaScript function can change when the function gets called in another location in the code. The keywords we use to name these data are parameters and arguments, but some developers confuse them.
In this article, you will learn about parameters and arguments and what they are, along with where and when to use them.
One of the fundamental building blocks in JavaScript programming is a function. It's a block of code designed to perform a particular task.
Functions are reusable code which you can use anywhere in your program. They eliminate the need to repeat the same code all the time.
To use functions in a powerful way, you can pass values in a function to use them.
Here is an example of a function:
function add(){
	return 2 + 3
}

add()
This is a function declaration, the name of the function is add, and it was called after the function with add() . The result of the function will be 5.
Let's introduce parameters and arguments in the function.
Take a look at our function code now:
function add(x, y){
	return x + y
}

add(2, 3)
We have introduced x and y here and changed the location of the 2 and 3. x and y are the parameters while 2 and 3 are the arguments here.
A parameter is one of the variables in a function. And when a method is called, the arguments are the data you pass into the method's parameters.
When the function is called with add(2, 3) the arguments 2 and 3 are assigned to x and y, respectively. This means that in the function, x will be replaced with 2 and y will be replaced with 3.
If the function is called with a different argument, the same applies. Parameters are like placeholders for function arguments.
We can use arguments more efficiently when we want to make functions more re-useable, or when we want to make calling functions inside another functions more powerful.
Here is an example:
function add(x, y){
	return x + y
}

function multiply(a, b, c){ // a = 1, b = 2, c = 3
	const num1 = add(a, b) // num1 = add(1, 2) = 3
	const num2 = add(b, c) // num2 = add(2, 3) = 5

	return num1 * num2 // 15
}

multiply(1, 2, 3)
// returns 15
The first function add() has two parameters, x and y. The function returns the addition of the two parameters.
The second function multiply() has three parameters: inside the function, two variables are declared in it, num1 and num2. num1 will store the value of the result of add(a, b), and num2 will store the value of the result of add(b, c). At the end the multiply function will return the value of num1 multiplied by num2.
multiply is called with three arguments which are 1, 2 and 3. add(a, b) will be add(1, 2) which will return 3. add(b, c) will be add(2, 3) which will return 5.
num1 will have the value of 3 while num2 will be 5. num1 * num2 will return 15.
Arguments are passed in the multiply function which are also used as arguments for the add function.
Using parameters and arguments can be confusing at times, especially if you are just learning them. But if you first properly learn what a function is and how it works, you will understand parameters and arguments easily.
Thanks for reading this article. If you enjoyed it, consider sharing it to help other developers.
You can reach me on Twitter, LinkedIn and GitHub.
Happy Learning.
Posted on • Originally published at fjolt.com
As part of my continuous work to see how much I can do with just CSS (see other work such as the CSS only Minecraft Chicken), I decided to try and recreate Windows 98 using nothing else apart from CSS and HTML. Did anyone ask for this? Not really? Is it fun to try and see what you can accomplish with just CSS? Yes, sort of. Was it time consuming? Unfortunately yes.
Here is the demo - and a quick note - this is a desktop Windows recreation, so it is of course optimised for desktop viewing. Ironically, though, it probably won't work on Windows 98, since you would have to use a very old version of Internet Explorer to view it.
The link to the demo can be found here, since it is better viewed in full screen mode. In this demo the things which I thought were cool included:
It is however worth noting that the things that are hard or just down right impossible to do with only CSS, such as:
So, the first thing I wanted to get right about this version of Windows 98 was the look and feel. I'm using some pretty cool Windows 98 icons (which I do think should make a comeback), as well as the standard Windows 98 colour scheme. To get the indented and out-dented feel I used quite a complicated box shadow, as you can see here:
.windows-box-shadow, .minesweeper .content > label {
    box-shadow: -2px -2px #e0dede, -2px 0 #e0dede, 0 -2px #e0dede, -4px -4px white, -4px 0 white, 0 -4px white, 2px 2px #818181, 0 2px #818181, 2px 0 #818181,  2px -2px #e0dede, -2px 2px #818181, -4px 2px white, -4px 4px black, 4px 4px black, 4px 0 black, 0 4px black, 2px -4px white, 4px -4px black;
}
.inverse-windows-box-shadow, .minesweeper .content > label:active {
    box-shadow: -2px -2px #818181, -2px 0 #818181, 0 -2px #818181, -4px -4px black, -4px 0 black, 0 -4px black, 2px 2px #e0dede, 0 2px #e0dede, 2px 0 #e0dede,  2px -2px #818181, -2px 2px #e0dede, -4px 2px black, -4px 4px white, 4px 4px white, 4px 0 white, 0 4px white, 2px -4px black, 4px -4px white;
}
Everything else was relatively straightforward look and feel wise. The key to making all of this work is checkboxes and radio buttons.
Checkboxes and radios are the only way to store information in CSS. We can then use them to implement style changes. Checkboxes, when checked, allow us to enable or disable a single feature (like show a window, maximise a window, or click a minesweeper square). For things where there is only one option allowed to be active at a time (for example, which window should be on top) - we can use radio buttons. Both follow the same syntax in CSS, where we use the :checked selector:
#windows-11:checked ~ .windows-11 .text {
    /* -- CSS here -- */
}
Here, when the input #windows-11 is checked, it will affect its sibling's child .text - so we can apply some custom CSS. Importantly, since we can't easily style an HTML input, we use labels to model the different features of Windows 98. For example:
<form id="windows">
    <!-- Login and Shutdown -->
    <input type="checkbox" id="login-screen-input" name="login-screen-input" />

    <!-- Later on.. -->
    <label for="login-screen-input">Log Off</label>
</form>
Here, the label shown is associated with the checkbox #login-screen-input. That means when you click the label, it will check the checkbox. This basically gives us free reign to track a user's clicks, and then use the checkbox :checked status to show certain windows, in certain forms. The difficulty is you can only have one label associated with one input.
That means in a scenario where a button is supposed to open the window, and place it on top of all other windows, you'd have to use Javascript, since this will require tracking two states - the z-index of the window, and whether it is open or closed. This is a major blocker in implementing CSS only versions of complex UIs.
Since we have a login screen in a div for when a user logs out, we can't use sibling selectors to easily track who is logged in. We can still use :checked statuses to track this, but the inputs are too deep in our DOM to affect their parent's sibling's CSS. Fortunately, we can use the new CSS parent selector for just this task:
#login-screen:has(#login-window .select-box #zark-muckerberg:checked) ~ #start-bar .zark-muckerberg,
#login-screen:has(#login-window .select-box #donald-trump:checked) ~ #start-bar .donald-trump,
#login-screen:has(#login-window .select-box #spiderman:checked) ~ #start-bar .spiderman {
    display: inline;
    padding-left: 0.5rem;
}
Here, if #login-screen has a :checked div, we can use it to display the user name in the start bar, despite these checkboxes being deep within the DOM. This is pretty neat, and a useful way to use parent selectors if you ever wish to accomplish recreating a CSS only version of a Windows operating system.
Much to my dismay, there was no way for me to create a CSS AND selector using chained checked boxes. For example, consider this situation where we apply some CSS based on a :checked state:
#minesweeper-box-1-1:checked ~ .content > .minesweeper-box-1-1 {

}
This works fine, but what if we want to check if two minesweeper boxes next to each other are checked, before applying CSS? I thought, logically, that the selector would only continue if both were checked - so tried this:
#minesweeper-box-1-1:checked + #minesweeper-box-2-1:checked ~ .content > .minesweeper-box-1-1 {

}
But unfortunately, that doesn't work. So while we have a way to track state in CSS, it's quite hard to track multi-conditioned checkbox states to create logical statements and styles based on that. That's disappointing, but it doesn't limit us too much for our Windows 98 implementation.
Windows 98 text is not anti-aliased. To remove anti aliasing (at least for some browsers), and achieve that classic, crisp, Windows 98 finish, I used the following CSS:
body {
    -webkit-font-smoothing: none;
    -moz-osx-font-smoothing: grayscale;
}
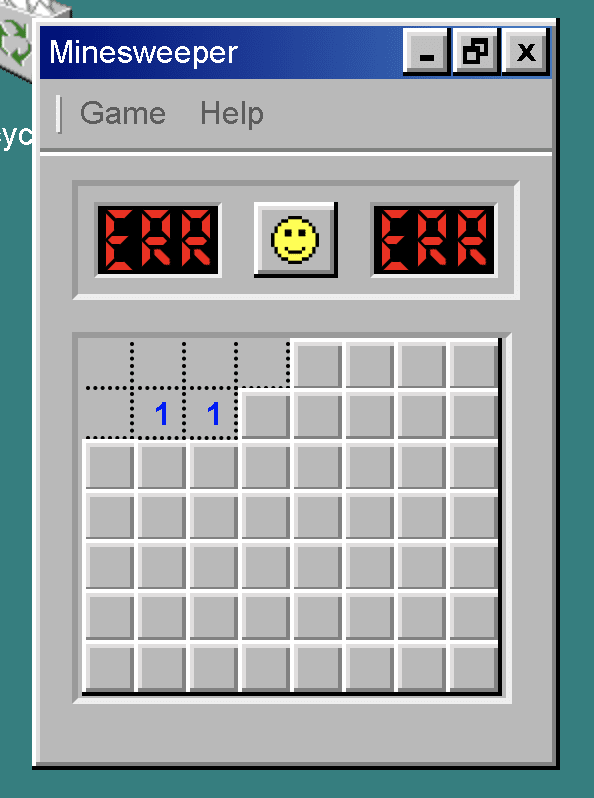
So one of the major undertakings in this project was recreating Minesweeper. I kept the grid relatively small (to maintain my sanity) - but I had to make my own Minesweeper map created out of labels. Each of these labels mapped to an input, which tracked if a cell had been clicked or not. If a mine is clicked, it's game over and you can't interact with the board anymore. As there were ~56 Minesweeper cells, we needed an equivalent ~56 Minesweeper inputs. Tracking that all in CSS required a lot of CSS, but the overall result is pretty cool looking.
Overall, this follows the same logic as the previously mentioned checkbox and radio trick - so conceptually it's not any more complicated than anything else we've done.
I hope you've enjoyed this guide. Doing this reminded me of how web development used to be, when things were a lot harder to accomplish and required a lot of manual creation of DOM elements. It's fun to see what can be achieved in CSS all these years on (including the parent selector). Is this a realistic way to create web applications? Not really in terms of speed, and not yet in terms of functionality, but CSS did a lot more than I thought it would be able to, and I'm pretty happy with the results.
If you enjoyed this, please consider following me on twitter.
It's a scientific fact.
Ruben Casas -
Aswin krishna -
Leonardo Montini -
Vincent A. Cicirello -


Only thing lacking, and properly not possible with CSS-only, is the progress bar in Windows update switching between "2 minutes left" and "138.193 years left" 😂
Great job!
I actually thought about implementing that, not gonna lie haha. It is possible, maybe will require a CSS Windows 98 SP1 for that new feature 🤠
Great Job!
Thanks for sharing! It reminds me of BTC2(break the code 2). I was only able to reach the G4 drive(DotGang), didn't solve it. It was a good time.